Backup And Restore Database
From time to time Movienizer automatically prompts to create a backup copy of your movie database. Such backups can be quite helpful if your database is damaged (for example, due to a virus attack, power outage, etc.). A recent backup will allow you to restore all or almost all information about your movies, TV series, and about your favorite actors.
By default, a backup prompt is shown every 7 days, but you can change this in the "Options" menu of Movienizer.
You can also create backups manually. This would be especially reasonable after massive additions or changes in your movie database, or before any major changes in your system.
Creating Backups
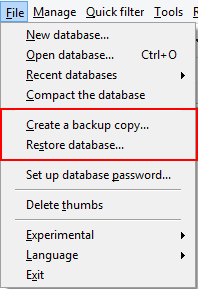
To create a backup, select "File" - "Create a backup copy":

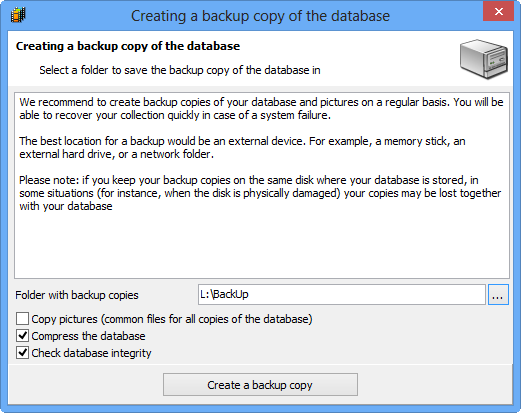
This will open a new window:

The "Folder with backup copies" field shows where your backup copy will be saved. Click on the "..." button to select a different folder on your computer. It is recommended to use an external device or at least a different internal hard disk drive for saving backup copies.
"Copy pictures" is by default disabled. If you enable it, the backup engine will copy all pictures from your database, otherwise no pictures will be saved with the backup copy. When using the backup/restore feature to move your database to a different computer, please consider enabling this option.
"Compress the database" will put your database file into a ZIP archive, thus reducing its size. If you have enough storage, disable this option. This will copy your database without compressing it, and the number of movies/people information will be available in the restore window (see below).
"Check database integrity" makes sure that the backup copy you create is fully functional and will warn you if something is wrong. A small database error may go unnoticed for some time but will later cause bigger errors, rendering your database unusable. This periodic check will allow you to roll back to a previous good backup without loosing too much work.
Click on the "Create a backup copy" button to create a backup in the specified location.
Restoring Database
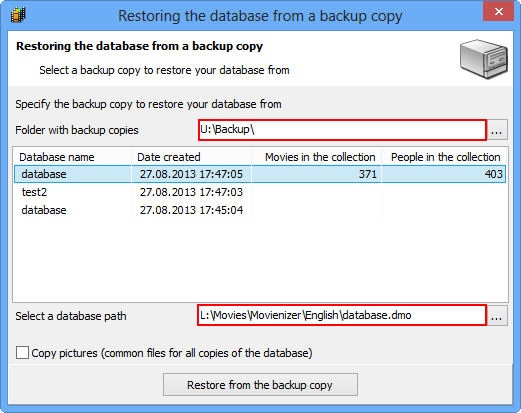
To restore your database from a backup, select "File" - "Restore database". Movienizer will show this window:

In this window, there are two important fields highlighted on the screenshot.
"Folder with backup copies" should point to the directory on your computer or external devices where backup copies of your database are stored. Click on the "..." button to select the correct folder. You will need to do this if you are moving your database to a new computer, after you reinstall your operating system, etc.
"Select a database path" shows the complete path and filename for the restored database. If a database with this filename exists at the specified location, it will be overwritten. You can choose to save the restored database to a different folder or under a different filename.
In the main area, a list of available backups is displayed. In our example, we have 3 backups, but only for one of them the "Movies in the collection" and "People in the collection" columns are not empty. This is due to the fact that the other two backups were created with the "Compress the database" option enabled.
The "Copy pictures" option will also copy all pictures, if they are available in the backup (they will only be available, if the corresponding option was enabled during the backup process). This is not necessary if you simply roll back to a previous good state, as all pictures are already available in the location of the main database file.
Click on some entry to select it and click on the "Restore from the backup copy" button to restore the database.
